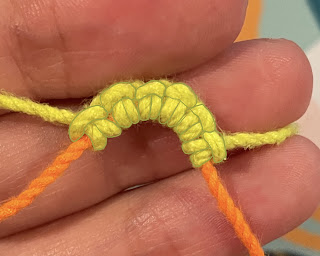
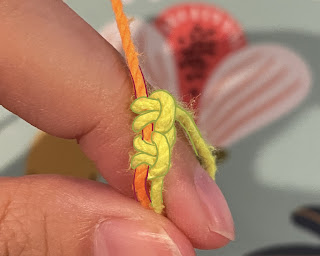
I recently switched to only doing unflipped chains when I tat. This is not my idea -- I got it from this YouTube video by Sparrow Spite.
There are going to be quite a few words in this post. Enjoy!
Why would we want to not flip our chains? Seems kinda weird.
Unflipped chains basically mean you stay on the front side of the tatting the entire time you're tatting (unless you're working a two-shuttle pattern).
And you can tat faster. Unflipped chains mean you don't have to reverse work nearly as often, or adjust the thread coming off the shuttle as often when switching from rings to chains or back, since you're reversing the shuttle that is used for the stitch thread.
Reversing work for me is kind of confusing, and I usually end up doing it properly, but I still sometimes twist something around, or mess up the curvature of a stitch. Tatting diagrams are top-down, and rotating them in my mind to line up with the upside-down tatted piece in my hand can be a lot!
I've also been trying to pay attention to the front side and back side of my work. So I'm attempting to nest chains properly and place picots between the right halves of stitches, all according to if I'm working on the front or back of the piece.
It's just a lot to track and execute neatly and quickly. And unflipped chains make tatting logistically and cognitively easier for me.
If you are intimately familiar with tatting, here's a link to the conclusion without all the in-depth explanation. You could also just watch the section of the YouTube video linked above.
Tatting stitches have directions -- top versus bottom.
Stitches will always curve, because of their structure.
The bottom of each stitch has two legs, and those grab on to the core thread (orange). The top half of the stitch is the cap that the legs go through, and how the stitch thread progresses to form new stitches. The top half of stitches always faces outwards, as the top half is wider than the bottom.
This is important because sometimes after completing a chain or ring, you will have to reverse your work in order to create the next chain or ring in the right orientation with the right curvature.
In the above diagram, we start with ring 1. We reverse work for chain 2. Reverse work again for ring 3. Reverse work for chain 4.
But we do not reverse work for ring 5, or again for chain 6.
And then we reverse work for ring 7.
The lighter purple indicates the top of the stitches (or the outside curve), and we have to pay attention to that as we follow this diagram. If we reverse work, or do not reverse work, at the wrong time, our chains will curve the wrong direction, or our rings will be on the wrong side of the chain.
The second item in play is flipping versus
not flipping stitches. Traditionally, every stitch is flipped (except
in the case of split rings or split chains).
To make a half stitch, you first make a half hitch with the shuttle/core thread (yellow):
There are two types of half stitches -- the first half, and the second half. Together they form a full stitch. The tops of the stitches are on the left of the core thread, and each full stitch has two "legs".
Here are two full stitches in orange, on the front side of the work. First half, second half; first half, second half. They're farther apart than they should be, to demonstrate that they're just loops on a core thread.
But what if we didn't flip our stitches?
This is the same order of half stitches -- first, then second, just unflipped. You will notice it looks very different.
Other than the stitches being in yellow (shuttle thread). the tops of the stitches now are to the right of the core
thread, and though there are four stitch legs, there is only one visible
top stitch. It looks like a loop, a full stitch, then a loop.
What
happened? Well, we didn't flip our stitches, so the loops are
effectively reversed. And it therefore looks like we're on the wrong
side of our work.
If we do not flip our stitches, and also reverse the order of half stitches (and do not reverse
our work), we get stitches that look similar to flipped stitches, but
on the other side of the core thread. Two wrongs make a right, kind
of.
See? Two full stitches, each with two legs, and one top. We just had to do the stitch halves out of order.
A side-by-side comparison, with stitch halves numbered:
Can we go from ring 1 to ring 2 without flipping our work?
If we flip our stitches as usual for the ring, do not reverse work, and go straight into the chain, we would end up with something that looks like ring 5 and chain 6, ie the curvature of the chain would be backward relative to the ring.
A natural consequence for not reversing our work.
However, we now know that not flipping our stitches can be used to create stitches that look like the right side of our work, with the opposite orientation to the core thread!
A modified version of the original diagram:
We start at the same place. Blue numbers indicate flipped stitches. Orange indicate unflipped stitches (that 5 should be a 6, oops).
We do not have to reverse work until we finish chain 4 and start ring 5, and one more time between ring 5 and chain 5.
For this particular diagram, that means we halved the number of times we have to flip our work!
And this is a two-shuttle diagram (rings on both sides of the chain). For one-shuttle or shuttle/ball diagrams, using unflipped chains means you never have to reverse work. Which is awesome!
That concludes this post. It seems weird, but unflipped chains have made my life easier. Try it out on a small motif and see if you like it as much as I do.


Comments
Post a Comment
Comments? Concerns? Criticism?