I have woven some samples and smaller things, but these scarves are the first "real" products with this loom.
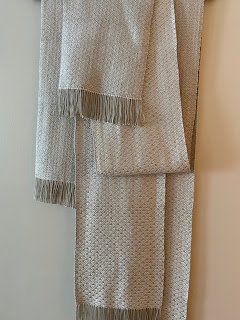
I don't have very flattering pictures of the scarves together, and have already sent one to my mom, but they are beautiful in person. Shiny, because silk. And soft, probably again because silk. They drape really nicely and I think have a subtle but visually effective weave.
I ended up liking the reverse of the fabric better than the intended right side. I discovered that while sampling, so for these scarves, I reversed the tie ups so I was looking at the wrong side of the fabric as I wove. This was actually a really good thing, because it not only significantly simplified the tie ups and treadling pattern, it also was easier to spot treadling errors with the wrong side facing up.
The pattern is one I found online:

I chose to use a gray for the warp and white for the weft. I liked the white as weft better when sampling, and the white silk had a lot more knots in the skein. I didn't want to deal with knots in the warp, so that also affected my decision to put the white as the weft.
Even though I avoided knots in the warp, I still had issues. I wound the warp on a warping board, and did the winding in three or four sessions. I believe I had different winding tension between sessions, or maybe even differing from start/end of sessions, because the warp had a lot of mismatched warp threads at the end. Dressing the loom was a bit of a disaster because of that, and also because I don't have lease sticks yet.
I ended up winding the warp on to the warp beam, then forward onto the cloth beam, and then back onto the warp beam again while combing it out. That resolved all the tension issues but left me with very uneven warp ends at the cloth beam. The ties there looked very scrappy, but they held. I think I lost three inches of warp because of this though.
Dressing the loom took me all day Saturday. I completed 120" of weaving on Sunday, and the rest Monday evening after work. I think to optimize weaving time, longer warps are needed! I'll have to get better at making warps and dressing my loom though. I don't think my process to fix the warp for these scarves would have been as workable with a longer warp.
I wet-finished the silk scarves similarly to how I'd wet-finish woolens. Just a little more careful to not put hard creases anywhere. And the internet recommended vinegar in the second-to-last rinse because silk is acidic (citation needed?) so it's best to try and restore the fiber to a more natural pH. Not sure if that claim holds up to fact-checks, but I did it, and nothing terrible happened, so there's that.
While
the fabric was damp, I ironed on low heat. Maybe a little aggressively,
because the yarn did get a little compacted. The fabric at this point
was a little stiff and dense, but thwacking it on a chair loosened it up
again.
Some fun details:
- 6 yard warp.
- 15 EPI.
- 158 ends (12 stitch pattern repeat, times 13 repeats, plus two floating selvage threads).
- Finished scarves were 8" wide and one was 84" long, the other was 96" long.
- I had about 6 more inches of the warp after the second scarf was completed, so the first could have been longer!
- Warp and weft were ~2,000 YPP 2-ply silks.
- I have probably a third of the gray left, and maybe a sixth of the white.
- Fringe is about 2 inches for each scarf.
Process pictures:
All set up and ready to dress the loom!

Here's the warp by itself, because it was a quite pretty (before I realized it was... slightly problematic):

Some initial weaving. I haven't yet gotten the muscle memory for neat selvages:

Some satisfying hemstitching between the two scarves:

The finished scarves. The scarf on left has the pattern's right side showing, the right scarf has the wrong side showing:

Ravelry project page.
Comments
Post a Comment
Comments? Concerns? Criticism?